What schematics can do for you
- Jul 31, 2025
- 4 min read
What is a schematic and why are they important for knit patterns?
WHAT IS A SCHEMATIC
A schematic is a flat line drawing that provides a visual rendering of the finished item with various measurement points to help knitters understand the shape of the item.. It can be as simple or detailed as you'd like, as long as the key measurements are shown accurately and completely.
I have seen designers use actual photos of their finished object, but sometimes the photos don't accurately show the item well. Real garments can get accidentally warped and moved, so you may not see that there actually are tapered sleeves or slight waist shaping.
They also provide full detailed measurements, to help knitters decide what size suits them best, and what they might want to adjust to achieve their desired fit or make adjustments in certain areas. Your front page usually provides the basic measurement, such as a bust or foot circumference. The schematic comes in handy to show more detailed measurements, such as sleeve length, neck width, hat height, foot length, etc. depending on the pattern.
WHAT PATTERNS NEED IT
Not every pattern needs one. If it's a super simple accessory with one or two measurements, it's not something to necessarily worry about. But anything with various measurement points, complicated design/shape, etc. should include a schematic to help clarify how the garment works together and give a better visual on where each measurement is taken.
But personally, I think every pattern should have one, no matter how simple. They are a nice added detail to any pattern and help make your pattern stand out from others. Plus, they can be used in your pattern sales pages or to social media to help promote your pattern. Schematics can be included on your sales pages to help knitters see if it is something that would fit them, or if they can make adjustments for a more custom fit before they purchase.
WHERE TO GET ONE
If you don't want to make one yourself, you can hire a tech editor to do it. I have basic schematic outline sketches available for various wearable items. You can get them complete with measurement lines, or just the outline to add your measurement lines into later.
You can also make one yourself with an online program. Here are a few programs I have heard designers use to create their schematics:
Inkscape (free) (mac, windows)
Adobe Fresco (free) (windows only)
Concepts (free) (apple, android, windows)
Adobe Illustrator (subscription) (apple, windows, mac)
Procreate ($12.99) (ipad only)
What's the difference between a quick sketch of one and a vector drawing?
Well, simply put, it makes your pattern look more professional and thought out. Just like a tech editor, it's an investment into your pattern and business.
WHAT SHOULD IT INCLUDE
Besides the obvious shape of the item, it should include arrows and lines to indicate areas of measurement. There are then two ways you could list measurements for each area. One way is to provide it directly in the schematic drawing, which would work great for smaller items like accessories or simple tops.
Schematics can also be important for seamed items, or complicated constructions. For example a seamed sweater might need five drawings; to show the front, the back, and each sleeve. Then those drawings are laid out next to each other to show how the pieces work together. The fifth drawing would be of the item after it is complete, to show it's final shape.
HOW TO READ ONE
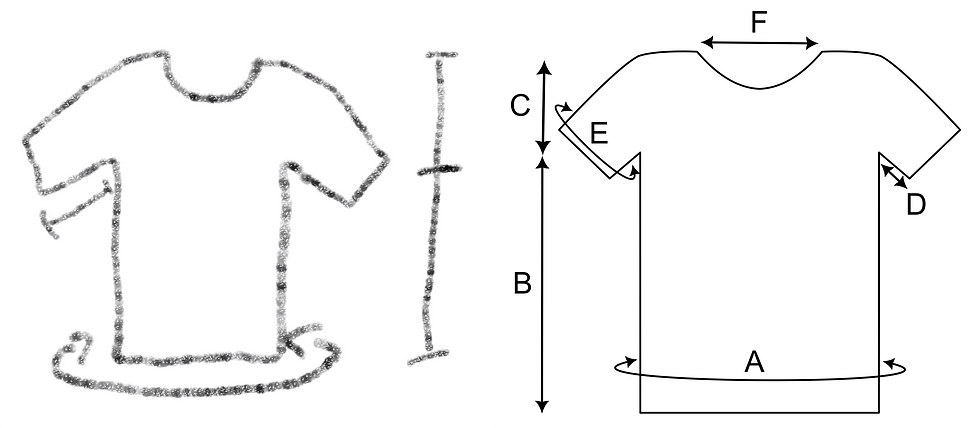
Let's take a look at a basic schematic and talk about how to read it, and how one can decide to make adjustments to achieve a custom fit.

It's fairly self-explanatory, but lets go through it anyways. Straight lines, like B, C, D, and F, indicate the measurement is from end to end. For D, it would be the length from the underarm to cuff. Measurements with circular-like lines, such as A and E, indicate the measurement is of the circumference. So for A, its the measurement around the whole sweater (bust), not just across the front on one side.
PROVIDING MEASUREMENTS
For smaller things like accessories, you can add the numbers directly onto the image. Make sure you include measurements for all sizes, and given in both inches and centimeters.
If it's a more complicated garment, like a sweater, you can provide them in a separate table directly below the drawing. Make sure to mark each line on the schematic with A, B, C, etc. and then correctly correspond it to the measurements in the table.
For the schematic above, the sizing table might look something like this (with full sizing from XS to 5XL):
Measurements | Small | Medium | Large |
A - Bust | 32 in / 80 cm | 36 in / 90 cm | 40 in / 100 cm |
B - Body length | 16 in / 40 cm | 16 in / 40 cm | 16.5 in / 41.25 cm |
C - Armhole Depth | 6 in /15 cm | 6.25 in / 15.5 cm | 6.25 in / 15.5 cm |
D - Sleeve length | 16 in / 40cm | 16 in / 40 cm | 16.5 in / 41.25 cm |
E - Sleeve Circumference | 14 in / 35 cm | 14 in / 35 cm | 14.5 in / 36.25 cm |
F - Neck width | 5.5 in / 13.75 cm | 5.5 in / 13.75 cm | 5.75 in / 14.25 cm |
Then a knitter can look at the full range of measurements, and decide of maybe they want a larger or smaller sleeve, a shorter body length to make a crop top, or lengthen the armhole depth.