My cats ATE my mohair sweater!!
- Apr 15
- 5 min read
Now well, I mean, they didn't eat the (w)hole sweater. (Pun intended).
ASSESSING THE DAMAGE
My closet was left open overnight. Mistake #1 I guess. I saw this on the floor, just lying there innocently. I picked it up to fold it, setting it down front facing up. Folding it in half I notice a small little hole, like bad snag. Oh no! I flip it over to take a closer look and low behold, there are not one, not two, not even three, but FOUR HOLES in my favorite sweater. Along with that, there are many other spots where there are bad snags and smaller holes I must fix before they too turn into fist sized holes.

DECIDING TO MEND IT
Now, this is mohair, right? Have you ever frogged mohair? If you haven't, just know that it's the last thing you want to do. All those little fuzzies stick together like Velcro. It's a nightmare to even think about frogging.
I had a few thoughts run through my head about this situation..
Go through the pain of frogging it to re-knit.
Do a science experiment and see if felts. Turn it into something.
Sadly throw it away and buy new yarn to make a new one.
Mend it - but how? I don't really see any tutorials for seamless mending in pattern?
Well, frogging it wasn't sounding good, absolutely didn't want to put myself through that mess. I didn't want to see if it felts. And throwing it away? That's just wasteful. I knit to support slow fashion and mend things when they get worn or broken. So, let's mend it!
But how? Most patching tutorials I found involved weaving or just fixing holes in regular stockinette stitch. But this pattern isn't so easy - it's lace. It has decreases, increases, yarn overs. I couldn't find any tutorials on fixing lace so that the mend is seamless and nearly invisible. Well - guess I'm on my own. Let's see how this goes...
(Now mind you - this is less a tutorial and more just how I did it. But I hope this may too help you if you ever find yourself in this unfortunate situation.)
FUN FACT
Now, in case you didn't know, cats are actually attracted to your sweaters! Not because they look unreasonably stunning and fashionable, but because of what the wool has. Most wool has lanolin, which is a natural oil that helps protect the wool. It's scent to cats can actually be similar to the pheromones that nursing cat mothers produce. It calms and sooths the kittens. That and the wool (especially mohair) being so soft and cuddly...well, I'm sure if I was a lonely cat with mommy issues, I too would look for comfort in the wrong places.
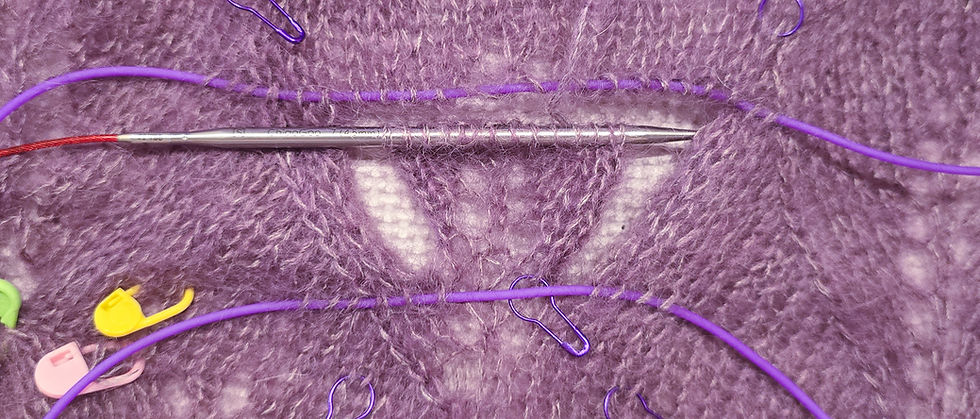
STEP 1 - STABILITY
First thing with any mending job - find a stable row to frog back to. I did this on the top and the bottom of the hole. I also inserted my needles wider than the width of the hole. Since this pattern has decreases and increases, I needed to make sure that where my needles are, it would be safe to frog back to. This one was tricky - the bottom of the hole started with three stitches, while the top had 13 stitches! You'll see it better in the next photo.

STEP 2 - FROG
Time to frog back. I cleaned up the hole by frogging columns of stitches at a time, until I could identify a whole stable column on each side of the hole. Then I flipped my work over, and with all those loose ends I tied them together (not pictured) to ensure they would not accidentally frog any further, and to secure the column of stitches next to the opening.

STEP 3 - KNIT
Now I have to open my October Day sweater pattern and identify where in the lace repeat the hole is. Once I find that, I pick up the bottom three stitches to start knitting the pattern. Now, a tip for you - pick up an extra stitch on each side. These will be the selvedge stitches that you will use later to help sew the hole shut. These columns will disappear after sewing.
STEP 4 - KITCHENER STITCH
Now that I have knit the missing patch, I need to attach it to the top needle that is holding the stable row there. This is the only area I had issues with, for a few reasons. First reason being, that the join here may not be entirely seamless to the lace pattern - as I am either not skilled enough or it's just not possible to kitchener stitch together in pattern.
The other reason being I had a hard time figuring out where I was in the pattern repeat and how it attached to the top of the hole. I knit how many rows were missing, but then it wasn't matching up at the top. So I frogged back and knit a few more rows. Nope, still not it. Frogged back a row. Nope, still not it. I finally said "close enough" and found a way to sew it all together so it looked mostly seamless. I think I did okay.

STEP 5 - MATTRESS STITCH
Now, we have the right and left sides that we need to take care of. This part was easy. All I did was use the Mattress Stitch to sew together the sides - using the selvedge stitches from the new panel and the "selvedge" made from the knots of the loose ends we tied earlier.


STEP 6 - WEAVE IN YOUR ENDS
Everything has been attached and sewn together, the last step is to weave in ALL the ends. All those loose ends, weave those bad boys in for extra security - don't just leave them as knots! I never trust a knot by itself, especially after a mending project.

STEP 7 - FEEL LIKE A MAGICIAN
After that, we go back to the right side, and admire our work, and feel like an absolute wizard of magic for what you just did. (That's how I felt anyways.)

I will say the kitchener stitch spot at the top does look a bit rough/bulky - but that's mainly because the mohair got felted and torn and ripped from me redoing it literally five times over. But hopefully with blocking it'll blend in a bit more.
STEP 8 - DO IT AGAIN
And now, do it again to all the holes in your sweater! Fix large holes by knitting the missing section, and fix smaller holes by simply using duplicate stitch over the hole and a few adjacent stitches/rows. After you're done, block your item and see if you can find where those holes were again. Unless I hold this up to the light, it's hard to tell where they were!

And that my friends - is how to save your sweater.
Hopefully this may help you on your sweater or other finished object that doesn't seem to easy to fix. And even it's not perfect - at least it is fixed and it lives to see another day.